|
MAD Boxes |
||||||||||
| MAD Boxes ?? | ||||||||||
|
MAD (Modular Ambient Display) boxes are homebrew monitors that can be stacked to create multi-monitor displays. Each box contains a single projector that projects onto a 36 " diagonal rear-projection screen. The boxes are self-contained and can be stacked together. There is approximately a 2mm gap between each display surface, but the entire surface is flat (there are no bevels). The MAD Box project is run by Dr. Sheelagh Carpendale. I was a Research Assistant, they were also kind of my idea. The project is funded by The Canadian Foundation for Innovation (CFI). The box hardware (frame, screen, projector, etc) was developed in conjunction with Visual Structures, but I think they have been purchased by Draper.... (There is a story here. We went through a local company, Apex AVSI, to have these built - they contracted out to Visual Structures. We were curious what Visual Structures thought about them, i.e. were they interested in the idea, etc. The initial response was that they were not. But the sales rep we dealt with later told us that VS took some of the boxes to a trade show and people loved them. I don't know if that's true, but we inquired recently about buying a few more, and they sent us back a design that looks quite a bit different from the boxes we have now. So maybe other people out there are buying "our" boxes. And I think that's pretty cool....) Eric Penner and Simon Nix have also contributed quite a bit to the project, but I don't know if they have webpages for me to link to. We have also published some material about them: MAD Boxes: A Plug-And-Play Tiled Display Wall (2005) Schmidt, R., Penner, E., Carpendale, S. Technical Report TR-2004-768-33, Department of Computer Science, University of Calgary. [PDF] Reconfigurable Displays (2004) Schmidt, R., Penner, E., Carpendale, S. Workshop on Ubiquitous Display Environments at Ubiquitous Computing (UBICOMP) 2004, Notthingham, England. |
||||||||||
| Screen Configurations | ||||||||||
|
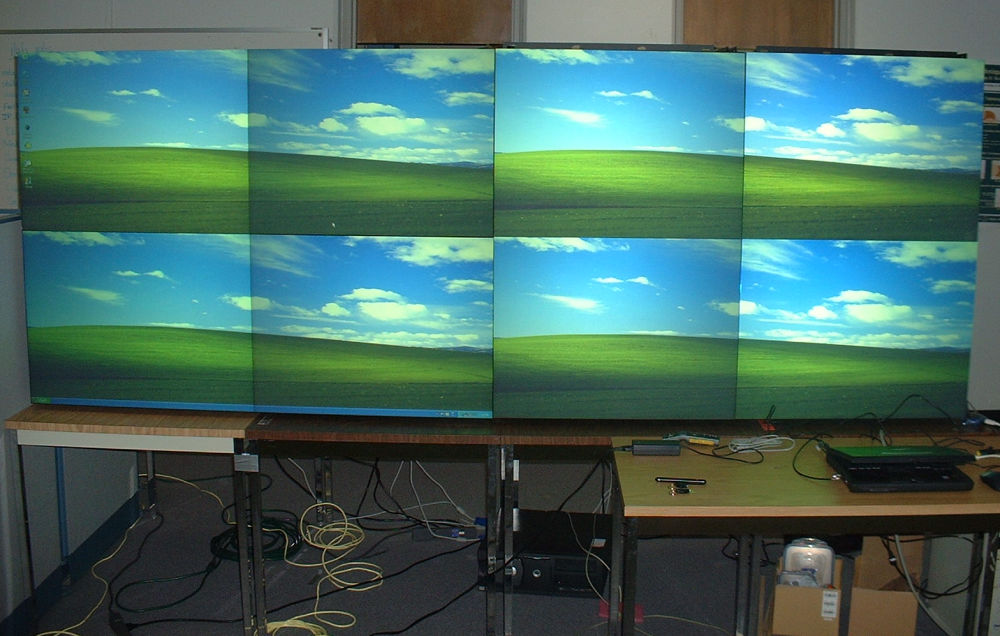
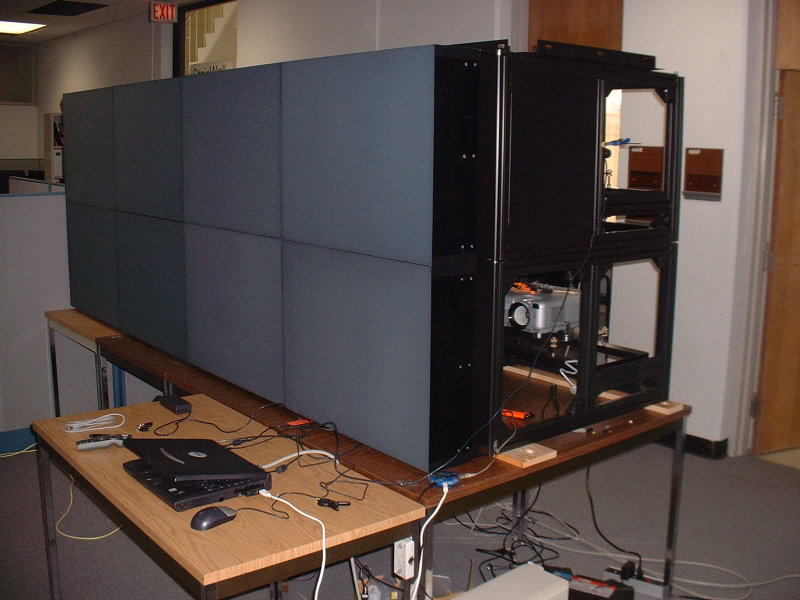
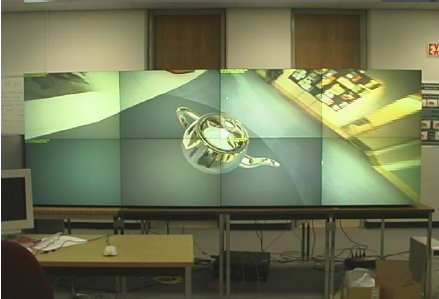
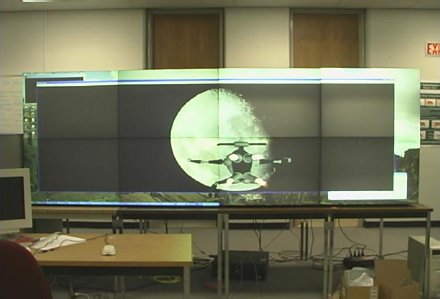
There are two main benefits with MAD Boxes - simplicity and modularity. I'll get into simplicity below, but first I'm going to show off the modularity. When we started out, we were thinking about building a display wall similar to the many display wall projects out there. But those walls are very limiting because the are totally inflexible. The screen and projectors have a large, fixed support structure. You can't move them around with a significant amount of (dis)assembly. This simply wasn't going to work in the iLab, because there is not a lot of free space and sometimes the existing space needs to be used for something else. Hence, MAD Boxes. Of course, we can duplicate traditional display walls. We've got 8, so we usually stack them 4x2 to get a pretty big but high-resolution display surface:
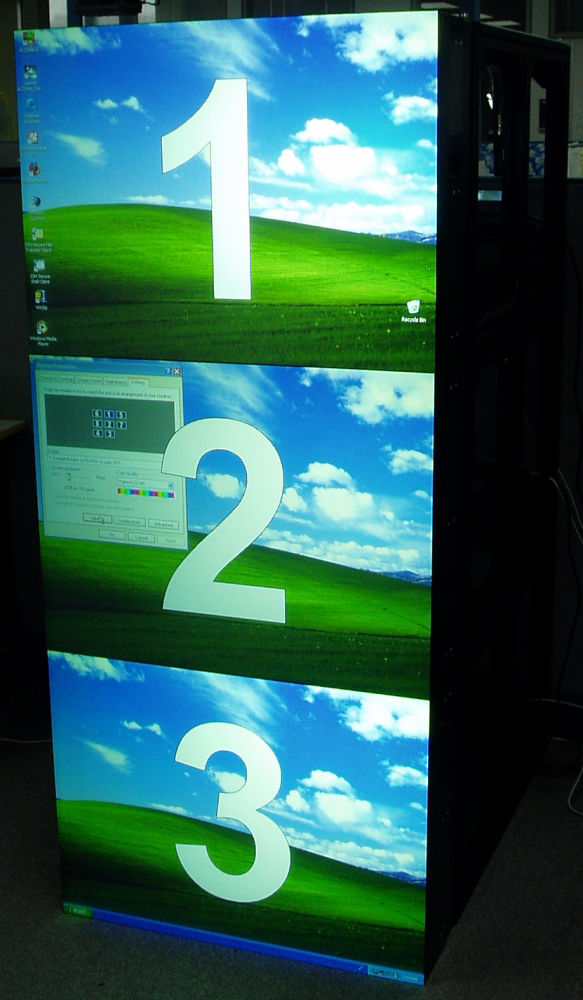
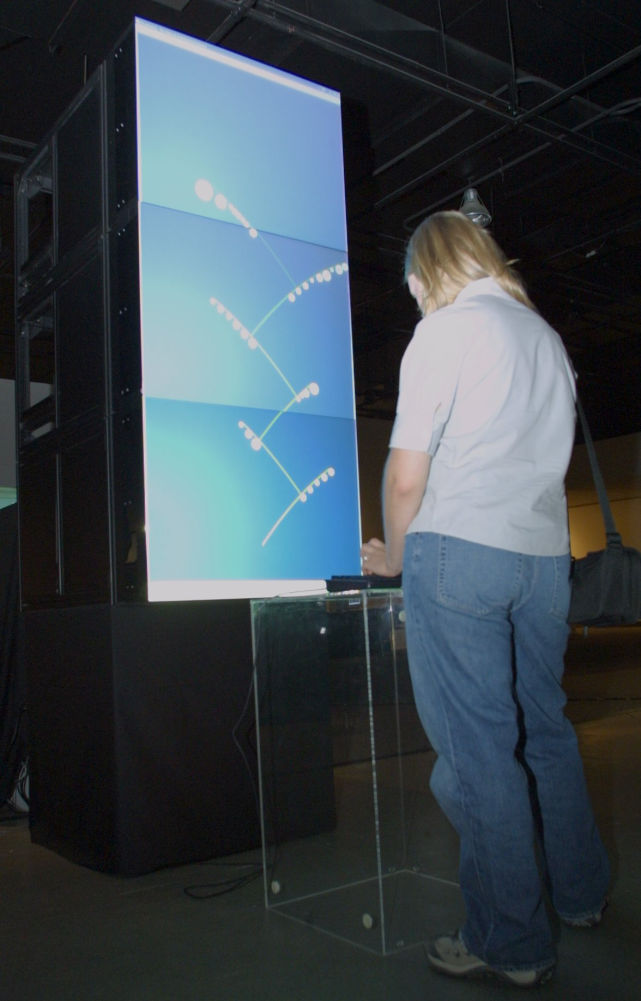
Another option is to make towers out of them. This is neat because a 3-box high tower is pretty tall. There has been speculation about full-body interfaces, although this has yet to be explored. A 3-box tower was used as part of an art show, shown below right.
Finally, you can make a tabletop with them. Unfortunately this voids most projector warranties, and is a fire hazard. Our warranties are expired, so we tried it out, but we haven't since then since it's a great way to ruin forty thousand dollars worth of projectors. With a more complex mount, I think you could rig the projectors to swivel, so they are pointing horizontally, and use a mirror to re-direct the image to the screen. Maybe someday...
There are some other obvious configurations - like a cave - that we haven't really tried out yet. We are waiting for 4 more boxes, then we have 12 and we can make a 3-sided cave with 2x2 box walls. And, of course, we can do all sorts of crazy arrangements. One arrangement that I find interesting is to have 3 boxes in an L-shape, with a large LCD display where the fourth box would be. The box screens sit a bit behind the LCD and act as a sort of storage space for documentation, e-mail, and so on. We work this way at the 8-box wall when we are setting things up, etc, and it seems to work quite well. You might use a few more with horizontal screens as an active desk top. This would be neat. Now someone just has to buy me a couple of these so I can set that up at home... |
||||||||||
| Box Construction | ||||||||||
|
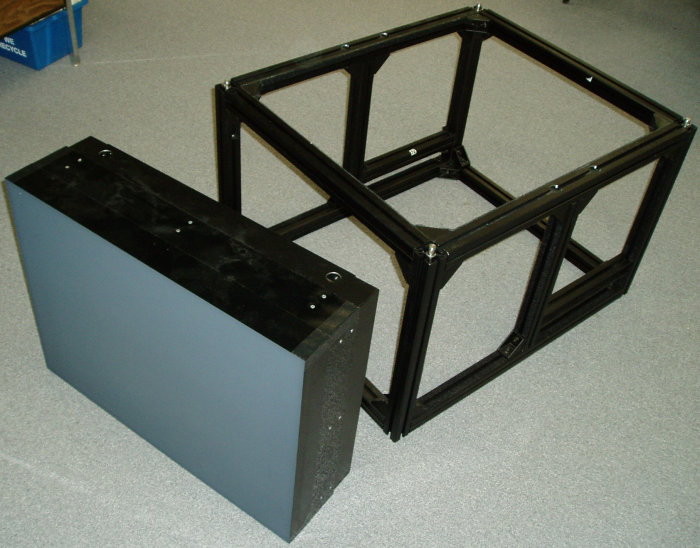
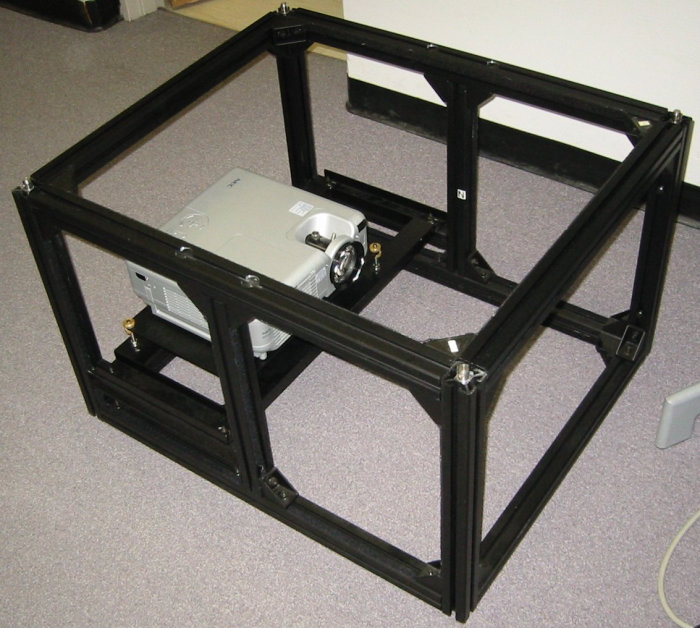
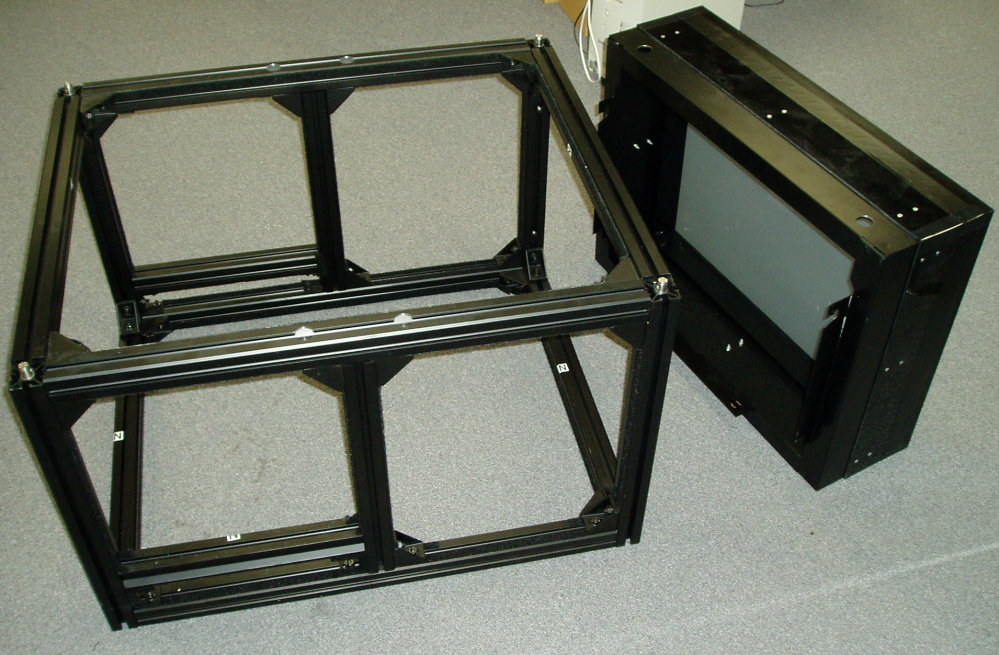
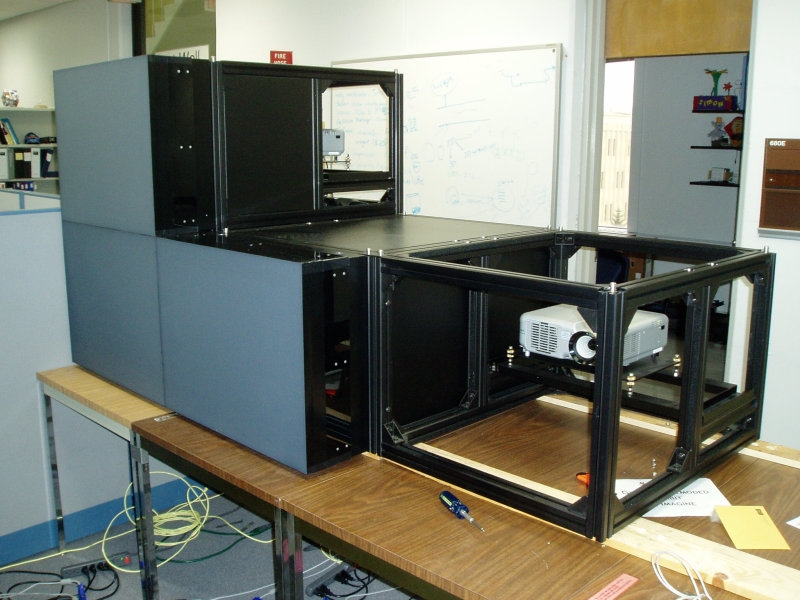
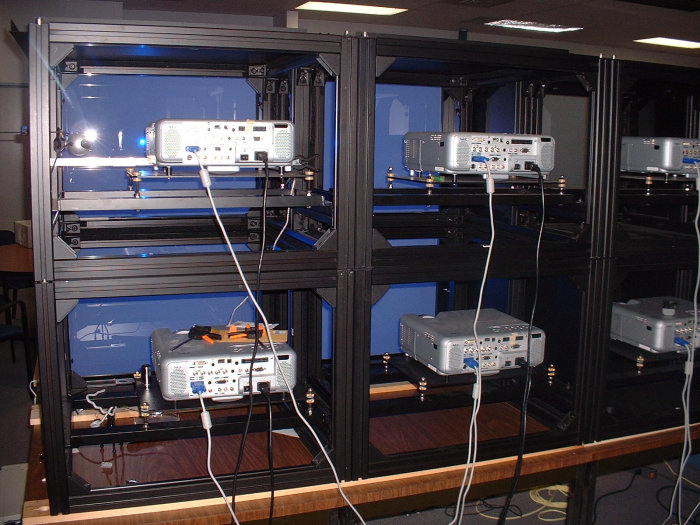
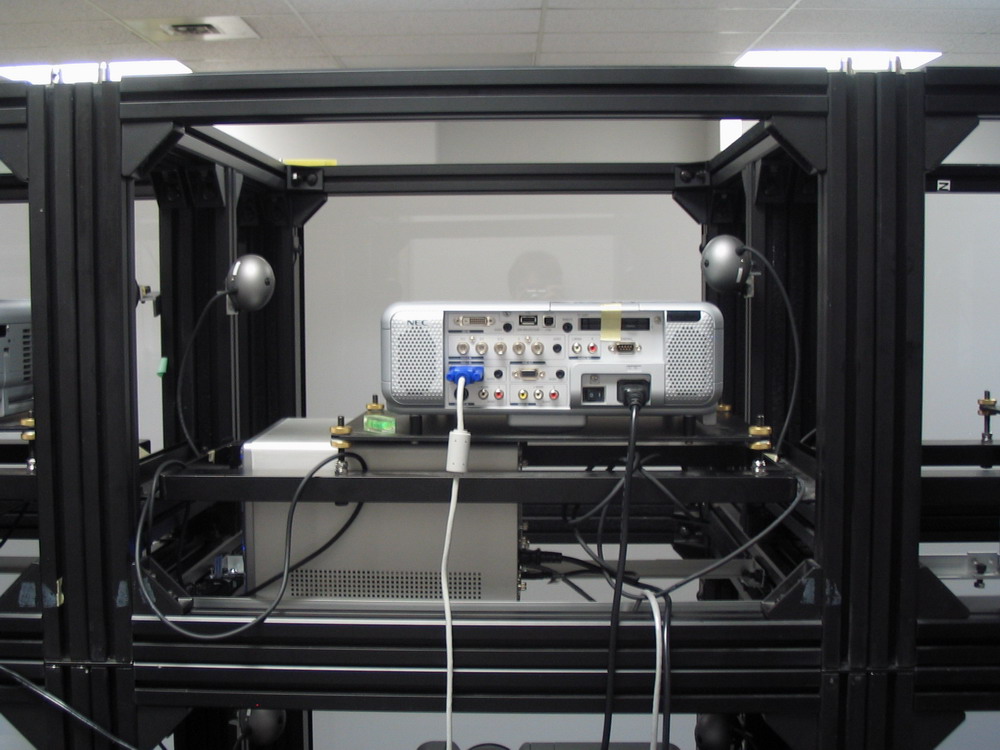
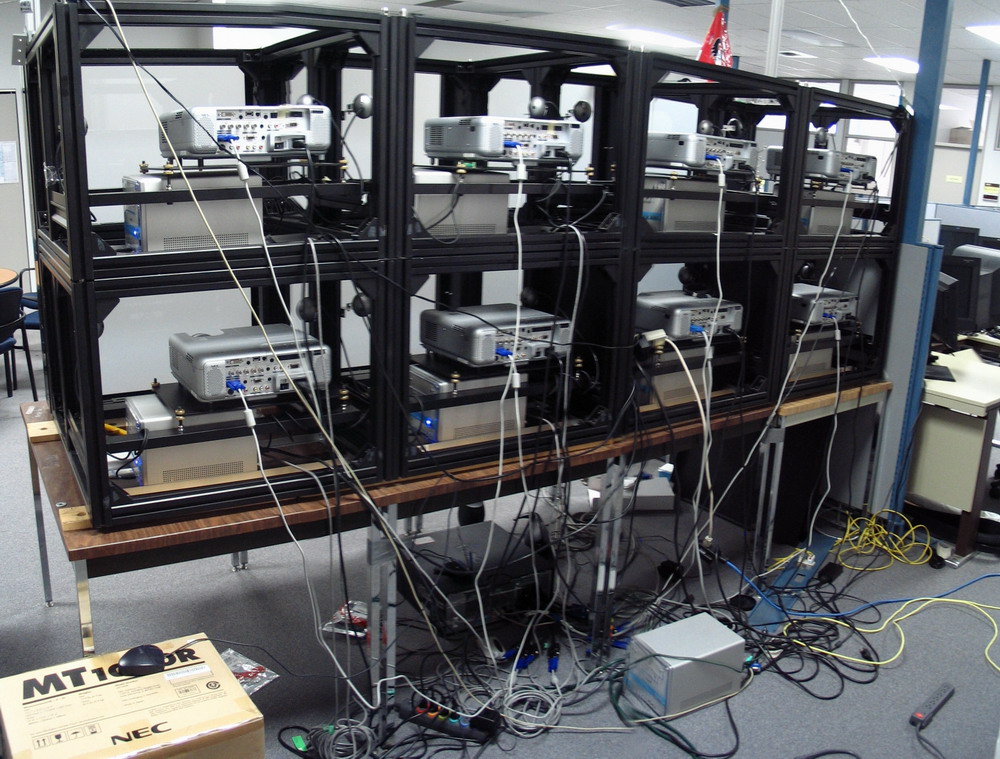
Each MAD Boxe is 29x22x43 inches wide/high/deep with a 36 inch display surface. Inside each box is an NEC MT1060-R projector that provides 1024x768 resolution with 2600 ANSI lumens (in eco mode!). They are super-bright, we use them with all the lights on and there is no issue reading text, etc. Of course they do look even better with the lights off. The screens are separate, they hang off the front of the boxes. This is nice because they are a bit fragile, so we can take them off before moving the boxes. Below are some pictures of the box frames, with and without the projector. You can see the floating mounts in the rightmost image, on the back of the screen (Click to enlarge):
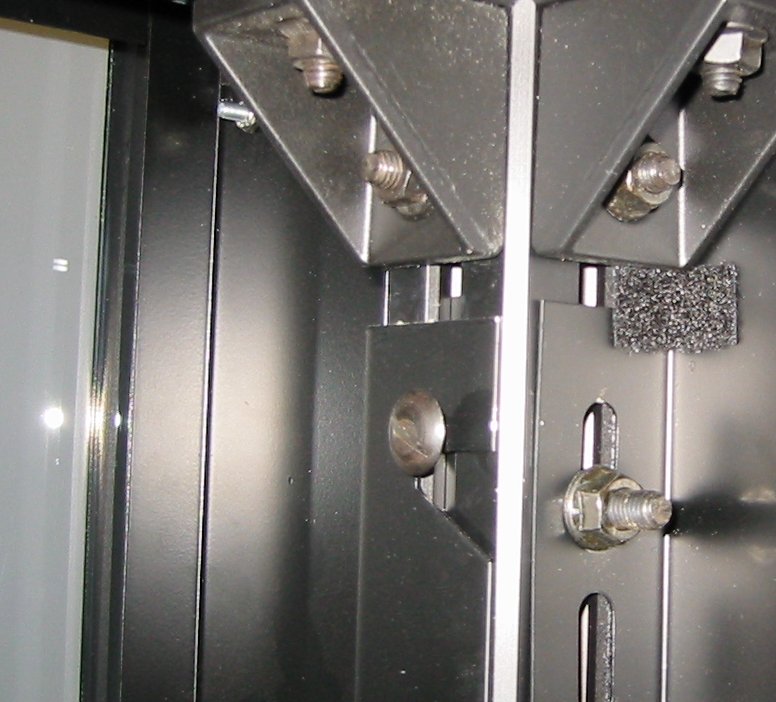
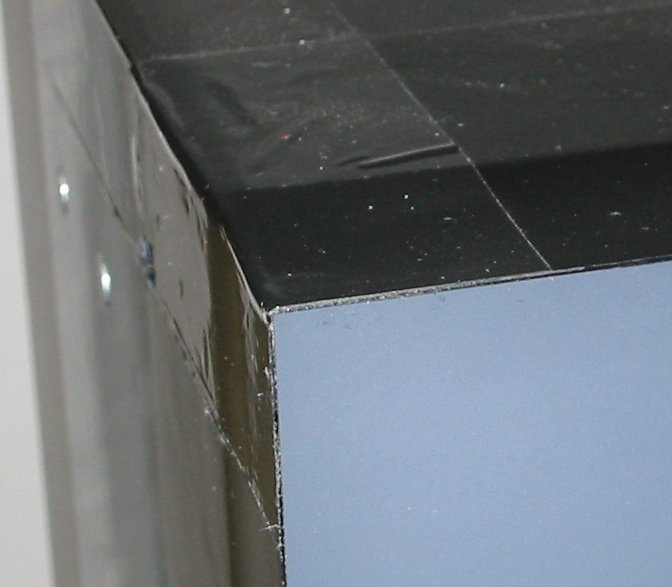
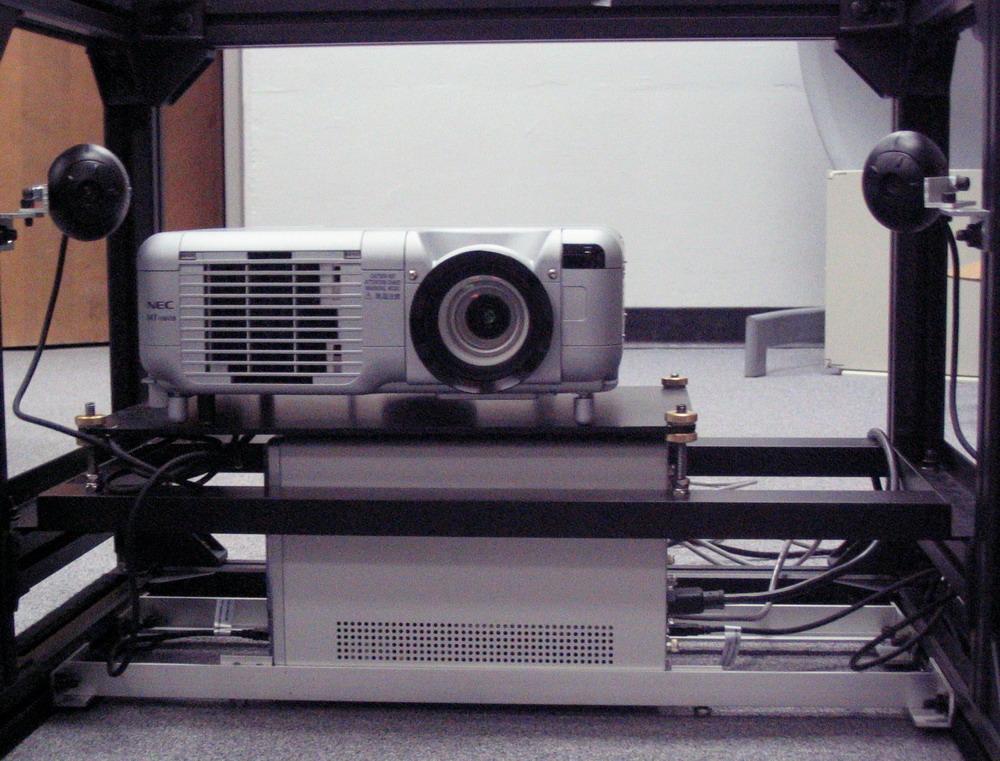
Below are some closeups of various parts. Left is the projector and "alignment" system. It is very primitive - just some bolts. But it works ok. See below for more information. The middle image shows a closeup of the "floating mount" screen hanging thing. Basically there are some little plates coming off the backs of the screens with notches, and they hang off bolts on the frame. Not very scientific. But it works pretty well, assuming the plates and notches are properly manufactured. Finally, the right image shows the corner of the screen. Yes, it is just taped on. But it is some kind of super-tape... (Click to enlarge)
The boxes are physically independent - you can literally think of them each as a big, ugly "monitor". Of course, these big ugly monitors can be stacked on top of each other, beside each other, and so on, ot create a large display surface. There is a gap of approximately 2mm between each screen. At a distance this gap is not nearly as noticeable as the color and brightness miscalibration between projectors. Up close you can see it, but it's flush with the screen so it does not impede touching. The screens are very rigid, there is no flexing when you touch them. Below are some images of the boxes in various states of assembly, one shot from the back, and a shot of the gap (Click to enlarge).
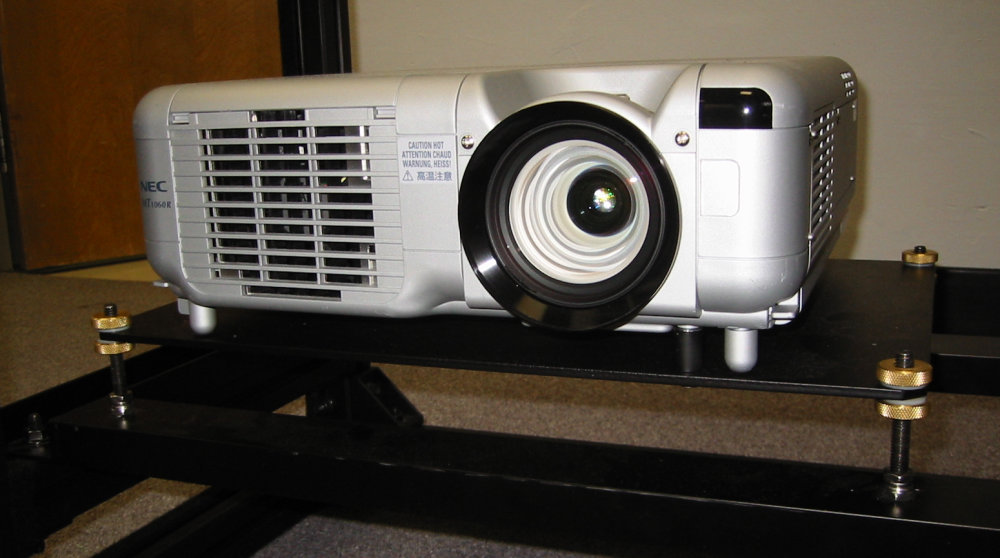
This design works ok for us. The main problem is weight - the frame is made from 1.75 inch aluminum T-slot and weighs about 60-70 pounds with the projector in it. Because of their large size, this is too much for one person to handle. So re-arranging the frame is a two-person job, although if you are both tall it is not strenuous. The boxes don't have to weight this much - they are built to industrial A/V standards. Basically, you could throw these frames off a truck and they would come out OK. That's not really necessary in a lab environment - if we had the time and money, we could have re-built the frames using 8020 and they would only weight about 20-25 pounds. Another problem is that not all the parts are manufactured extremely well. We did not discover some of this right away, and now we are stuck with it. Probably the worst is that the mounting brackets for one of the screens are badly manufactured, so it kind of sticks out. Very frustrating. There were some other problems but the machine shop fixed those... I said above that calibration was not a problem, even with the primitive "four bolts" mechanism. Technically we get all 6 degrees of freedom, but three of them come from slightly nudging the platform that the projector sits on. However, the projector is mounted in basically the right spot, so the necessary alignment is minimal. Each box only has to be aligned with it's frame, and the frame provides a very useful alignment guide. We just put up a full-screen image that is all black except for a 1-pixel white border. Then you can stand behind the box and tweak the controls until the pixels are all visible and not too far from the edge. Because there is a visible gap, minor alignment errors are not really that noticeable - at least, it seems to hide the internal projector drift that is supposed to happen as the bulb heats up. I haven't noticed that yet.... Power is one other issue. You can't just go plugging 8 projectors into a power bar. We tried four, and the extension cable got pretty hot, so it doesn't seem all that safe. We had extension cables running to a bunch of outlets, but once all the projectors and computers were set up, we were tripping breakers all the time. An electrician was called in to install higher-rated circuits just for the wall. |
||||||||||
| Display Input | ||||||||||
|
We wanted to avoid a cluster (more on that in the next section), so we drive the whole wall off one computer. This has a lot of advantages - particularly when the intended users of said wall are not interested in re-writing their software to use custom libraries, etc. It's the same Windows XP environment you would have at your local machine. With the right graphics card, it even looks like just two big monitors to Windows. Nice and simple. We use two four-output cards to drive the wall. This is the least-complicated thing we could come up with, but it does mean there are a lot of cables coming out of the back of the host machine:
This is actually kind of a problem, because they weigh down the PCI card quite a bit. The Dell machines we are using don't actually have screws for the PCI cards, just this plastic bracket, so they aren't held in place very well. Our Macgyver solution is to tape the cables up to the top of the computer, which takes the weight off the PCI card. I don't have a picture of that... |
||||||||||
| Interaction | ||||||||||
|
While the display wall is nice to look at, it's way nicer to be able to interact with it. You can put a SmartBoard over it, but that isn't very flexible, especially when you want to move the boxes around. So, we stuck some cameras and little computers inside them. Because of the limited field-of-view of the cameras, we actually need 2 in each box to see the whole screen. They are USB 2.0 cameras, which can do 640x480 resolution at 30fps. Cameras like this are great for doing interaction research, but they are hard to come by these days because most of the manufacturers making them have stopped doing so (at least, they had at the time we were buying stuff). Anyway, processing 16 USB 2.0 camera feeds is pretty compute-intensive. Too much for a single computer. So, the cameras in each box both plug in to a mini-ATX Shuttle XPC system mounted at the bottom of each MAD Box. The Shuttles sit on little racks that Simon built out of aluminum from Home Depot (he built 16 of them he is a trooper...). All the computers are connected up to the host machine with switches, so we can control all of them with Remote Desktop in Windows XP. Here are some shots of the boxes with the cameras inside them (click to enlarge):
And here is a panorama shot of the entire wall from the back, with all the power / video / USB / networking cables connected. Yes, it is a mess of cables...(click to enlarge):
|
||||||||||
| 3D Graphics | ||||||||||
|
Most of the display wall projects out there are relying on a cluster of computers to produce 3D graphics, usually the ratio between projectors and computers is one-to-one. These clusters require a significant amount of technical expertise to set up and maintain. For interactive applications, special high-speed interconnect systems (like Myrinet) are often required. The cluster is usually driven by a central computer. To use the cluster, applications must often be written specifically for it. This is non-trivial and really complicates use of a display wall. For some APIs, like OpenGL, replacement DLLs can be used that hide the cluster from the programmer. These are nice, but are only a solution for the APIs they exist for. In particular, there is no available solution for drop-in solution for Microsoft Windows GDI graphics. We really wanted to avoid a rendering cluster. We would like to use a single computer, ideally in a way such that existing software does not have to be changed. The first goal seems to be obtainable, the second is uncertain. The main issue is the graphics board. We need hardware-accelerated OpenGL, because a lot of the software people in the lab are writing uses OpenGL, and OpenGL without hardware acceleration is far too slow. Now, you can pop in a bunch of separate boards with one or two outputs each and get hardware OpenGL on each one, but usually you cannot stretch your OpenGL window across multiple screens and still get hardware OpenGL. Sometimes across two, but never across 8. And there is a limit to the number of cards you can fit into a PC... There are a few boards out there with 4 outputs. These seem idea, because we only need two of them. But most of them are not made for 3D graphics. We finally found on that worked - the Matrox QID Pro - but before that we tried an NVidia board that was not all that it seemed:
The QID Pro is working reasonably well for us. However, there are frequently technical "gotchas" involved that people who are less hardware-inclined don't realize. For example, an application might be developed on a single-display machine that uses framebuffer readback. On a decent workstation you can get 5-10fps doing a full-screen 1024x768 framebuffer readback each frame. But then you take it to the wall, where you have (for example) a 4096x1576 framebuffer. Framebuffer readback gets a bit more expensive. (Unfortunately I have yet to take any pictures or videos of OpenGL running on the wall. But see below for some captures from Eric's D3D wrapper) |
||||||||||
| Direct3D Replacement DLL | ||||||||||
|
The QID Pro option works pretty well if you have the hardware. However, before we had the QID Pros, Eric Penner developed a way to do hardware-accellerated Direct3D across multiple graphics cards. Normally this doesn't work, because D3D only is accellerated when you render to a D3D "interface", which essentially maps to a single "display" in the WinXP display manager. So when you stretch a window across multiple displays, the performance completely drops off. However, you do get hardware accelleration when rendering to multiple interfaces. So, if you create a separate interface for each display, you can do hardware-accellerated rendering across multiple displays. So Eric set up a system where a D3D interface with the correct projection matrix is automatically generated for each display. Then, he developed a D3D wrapper library that essentially forwards all the rendering calls to each D3D interface. The library is easy to use, essentially you just rename the system D3D DLL and drop in Eric's wrapper (just like how Chromium wraps OpenGL). Then you're off and running. It even supports windowed D3D, by dynamically re-sizing the per-display interfaces! The underlying idea here is to create a GPU-cluster in a single machine. This is *much* faster than a CPU cluster, even when connected with gigabit networking. PCIe cards have between 4 and 64 times the bandwidth of a gigabit network, and it is dedicated bandwidth for each card. So the GPU cluster approach can be *very* fast. Of course, it only scales up to the number of cards you can stick in a machine. Most systems today come with 5 PCIe slots, so with 4-head cards you could potentially get up to 20 displays. Also, with this approach it is easy to do distributed GPU programming (Which is something that cluster rendering systems like Chromium currently cannot do). Anyway, we had a poster at I3D 2006 about this library (click here for PDF). If you are interested in the library, email me and I will hook you up with Eric. Here are some shots of the D3D library in action - on the left is the standard D3D dolphin demo (with GPU caustics!), in the middle is a cube-mapped teapot, and on the right is a D3D game Eric wrote, running in windowed mode (Click to enlarge).
|
||||||||||
| Video Playback | ||||||||||
|
Video playback is another issue for display walls. Most graphics cards have at least some support for hardware-accelerated video. Without that support, playback framerate can be abysmal. The NVidia Quadro4 NVS did not perform at all here. When a video window was stretched across multiple span-2 outputs, it simply went black. No support, nothing we can do. The Matrox QID Pro is another story. For DVD playback we can stretch a widescreen movie across the whole wall and it plays back completely smooth. It's great. Video played back with software codecs is a bit spottier. It seems to depend on the screen resolution and the codec, which implies to me that all codecs are not created equal. Which makes sense, I guess. We have not done extensive testing, but with the newest Windows Media Player some WMVs can be played at full screen on 4 boxes with no apparent framerate drop. Of course, these videos are not recorded at 2048x1576, so there is quite a resolution drop. But it still looks pretty good. |
||||||||||
| Other MAD Box-Like Projects and Products | ||||||||||
| At least one company has taken the MAD Box idea and developed it into a salable product. The VisBox people have built what they call a VisBlock - a stackable rear-projection cube like the MAD Box, but with an HD (1280x720) projector inside it. They claim that there is no border between the blocks. I am somewhat suspicious, because it looks like there is in the pictures, but this might just be due to the near-impossibility of getting seamless color and intensity balance. If the projection really is "seamless", I would like to take a look at one of them. (The VisBox people talked to us when they were designing the VisBlocks, and we considered buying some, but it never happened).
Anyway, it looks like Virginia Tech's Gigapixel facility is the first place to have a VisBlock installation. And their students seem to be doing pretty cool stuff with it - one of the student blogs has a port of Warcraft 2 running on a 3x3 VisBlock wall. Definitely a project to watch... |
||||||||||
|
Questions?Comments?
Email rms@unknownroad.com. |