|
Constructing
Eye Rays / Tutorial |
| Basic Technique |
|
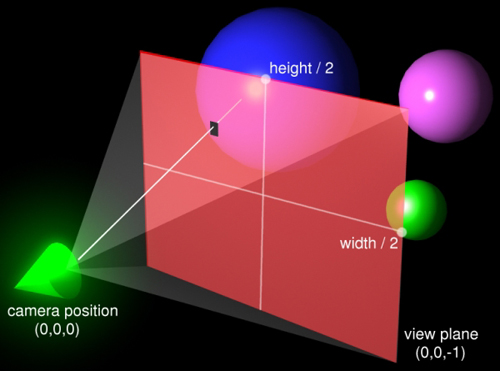
The first step in raytracing is to send rays from the camera (or eye) into the scene. This can get complicated, but we will start out simple. First we need a camera. We will assume the camera position is fixed at the origin. From this camera we want to send rays through a view plane. This view plane becomes the output image. We will use the plane at Z = -1 as our view plane. Remember, in raytracing the negative Z axis goes 'into' the scene. In the scene above, the view plane is represented by the red square and the camera is the glowing green cone (Maya made it glow - woohoo!). Essentially, we want to map the view plane onto our output image. We start by specifying the width and height of our output image in pixels. We also specify the X field of view. The X field of view determines how 'wide' our output image is. We also need a Y field of view. These two field of view parameters have a big effect on how the output image looks. For computer monitors, an X field of view of 45 degrees is usually good. From the X field of view we can generate the Y field of view based on the aspect ratio. You can try using a different Y field of view, but this usually results in distortion. You'll know when you have distortion because your spheres stop being round. So far, our math looks like this:
We almost have all the data we need to create an eye ray. We want to send a ray through the middle of each pixel, so we need the (u,v) coordinates of the pixel. The (u,v) coordinates are the pixel coordinates in the output image (ie the bottom-left pixel is (0,0) in (u,v) coordinates). Given (u,v) coordinates, we can calculate the (x,y) coordinates in the plane as follows:
We now have everything we need to construct our ray. The
ray goes from the camera at (0,0,0) to the view plane at (x,y,-1). The
ray can now be cast into the scene. |
| Common Problems |
| The
first time you do this, your image is going to come out upside down. Look
back to where we discussed (u,v) coordinates. It says that the (0,0) coordinate
is the bottom-left pixel. By default we seem to assume that (0,0) will the
the top-left. So when you write your file you get an upside-down image.
To fix this, store pixels in row v in row height - v of your frame buffer
array.
one other important thing to remember is proper types. Your height and
width, along with your (u,v) coordinates, are probably integers. Make
sure you do proper casting before the divides in the calculation of x,
y, and fovy. Also remember to make x and y floats. |
| Optimizations / Advanced Material |
| If
you want to write a really fast raytracer, you can avoid some of the redundant
work done above. First, fovx and fovy never change. That means you only
have to calculate their tangents once. This is nice, as tan() is an expensive
function.
Another optimization gets rid of the x and y calculations altogether. Remember, u and v are integer pixel coordinates. This means that the change in x and y between each adjacent row and column of pixels is a constant throughout the image. These differences can be calculated once at startup, then you just have to add them to the current (x,y) coordinates to get the next point on the projection plane. We assumed our camera was at (0,0,0) and the view plane was at Z = -1.
If you want to do animations, you probably want to be able to move the
camera. The best way to do this is with affine transformation matrices
(rotation and translation). You could transform the camera and then try
to determine new points on the view plane - this would be difficult. It
is easier to first create the eye ray using the method outlined above,
then transform that ray by your transformation matrix. The end result
is the same but the computation is much simpler. |
|
Questions?Comments?
Email rms@unknownroad.com. |